RAM Promaster Audio System Installation
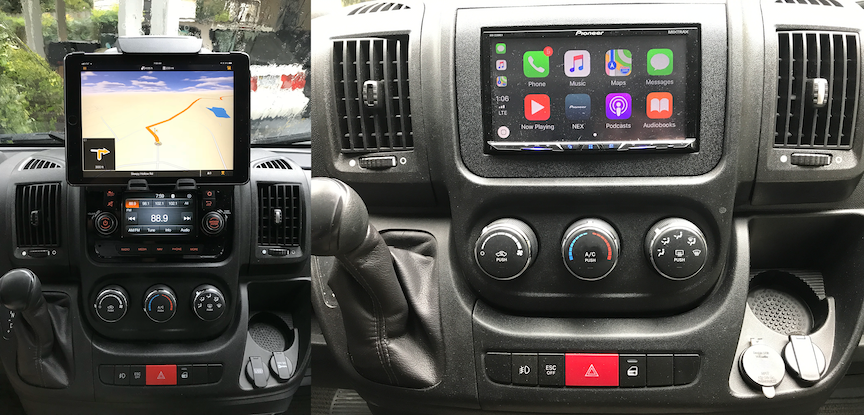
Dash Layout Before and After the Installation
The standard Uconnect head unit on our RAM Promaster based Pleasure-Way RV left a lot to be desired. It had poor audio quality and its built-in navigation system was inaccurate, slow and difficult to program. I also felt like I needed to learn Klingon to use its built-in voice command system.
I had found a way to enhance the navigation capabilities by docking an iPad in our new Dash Clipboard Replacement but the other issues were still present so I started to research alternatives.
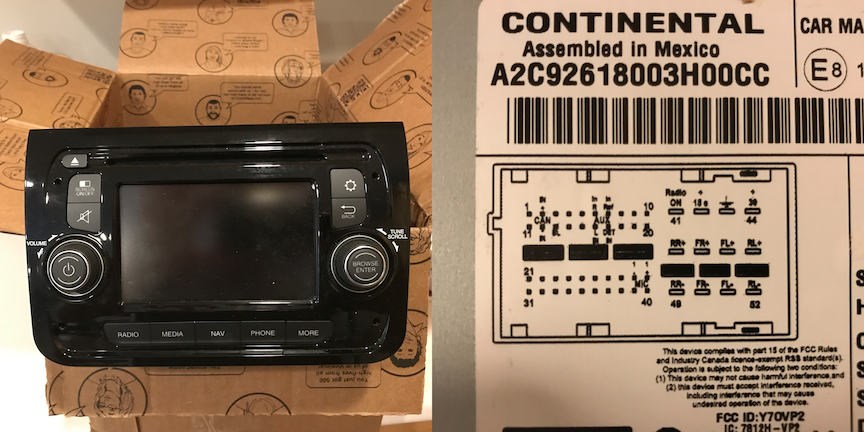
Front and Back of the Original Head Unit
The stock unit interacted with controls on the steering wheel and was integrated in to the vehicle’s CANBUS. It was the only interface to control a number of items like lights, heated seats and locking options. It was important to retain these functions during the upgrade process.
I turned to Crutchfield to start researching my options. Crutchfield is usually a great resource to determine what components will work well in a particular vehicle. In this case they were not. They simply had no clue how the dashboard was organized on a 2016 RAM Promaster and did not understand what type of connections were present on the back of the stock radio. They also did not have any accurate advice on how to retain the CANBUS and steering wheel controls.
I hopped on the Internet to find and order the correct adapters to fit the harness, antennas and USB port. I found that most of the items were designed to fit a Fiat sound system. My research had determined that a device named the iDatalink Maestro ADS-MRR Interface Module with an iDatalink HRN-RR-CH3 Factory Integration Adapter would preserve the CANBUS controls and steering wheel functions. I decided to pair that up with a Pioneer AVH-2330NEX head unit. The project also required a Metra 95-6523 Dash Kit to secure and finish the installation.
For the door and A-pillar speakers I decided on a set of Infinity Kappa 60csx component speakers and some Metra 71-017C Speaker Wiring Harnesses. To improve the bass I decided to add a Pioneer TS-WX130DA Compact Active subwoofer under the passenger seat.
Installing the Head Unit
Removing the original unit was made easy by using the Metra Radio Removal Tools. The tools were inserted in the holes on the left and right side of the head unit to unlock it. The unit just slid right out.
I also removed the two lower dash panels to get easier access to everything. Both covers were held in place with just a few easy to access screws.
After disconnecting the cables from the rear of the unit I connected the various adapters to the original harness, usb and antenna connections.
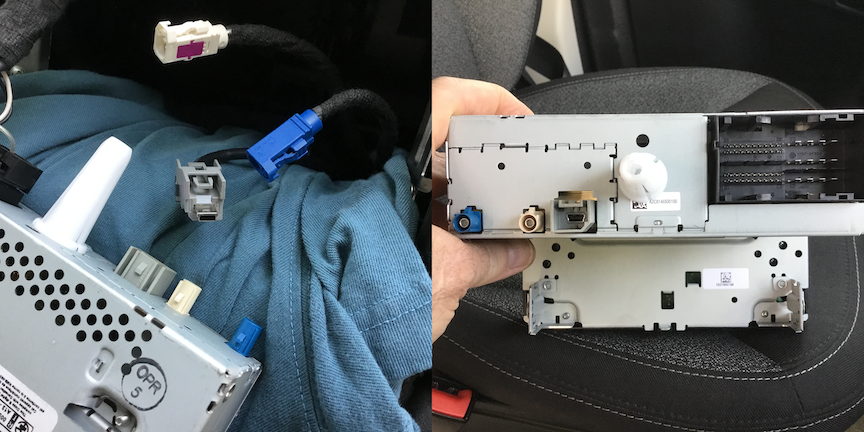
Rear View of the Original Head Unit with Cables
I programmed the Maestro to let it know which head unit and vehicle it would be attached to. I then wired the iDatalink CH3 harness adapter to the Pioneer’s harness and connected the Maestro. The instructions provided by both the Pioneer and Maestro manuals were easy to follow.
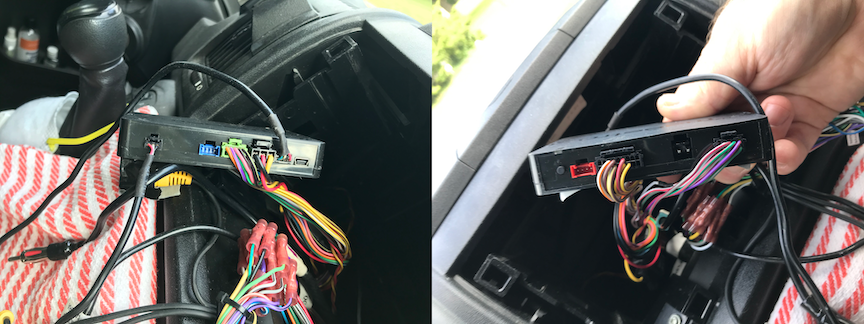
Maestro RR Unit with Connections
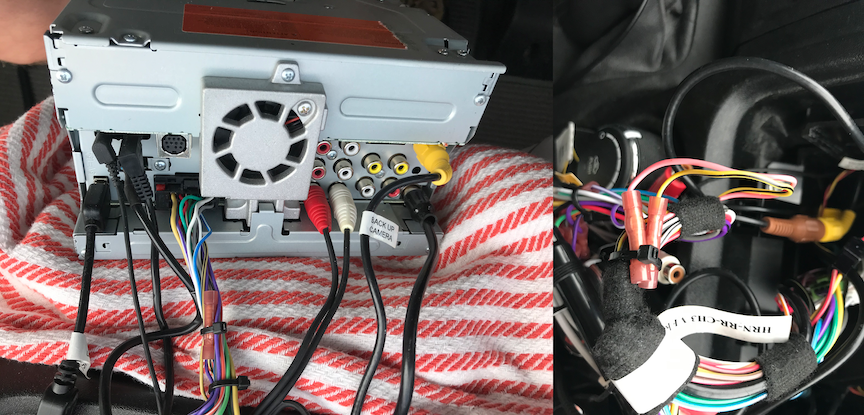
Rear view of Pioneer 2330NEX and Maestro RR Harness
Once the programming and cabling was complete it was time to organize and place the Maestro and wiring in the dash. There was plenty of room to store it away and then slide the stereo into place. The last step was to snap the Metra trim in to place.
The head unit fired right up and the Maestro was doing its job well. The steering wheel controls were all responding and all of the former stock CANBUS settings were available. It was a nice surprise to discover that the Maestro had also unlocked several new gauges and a tire pressure display.
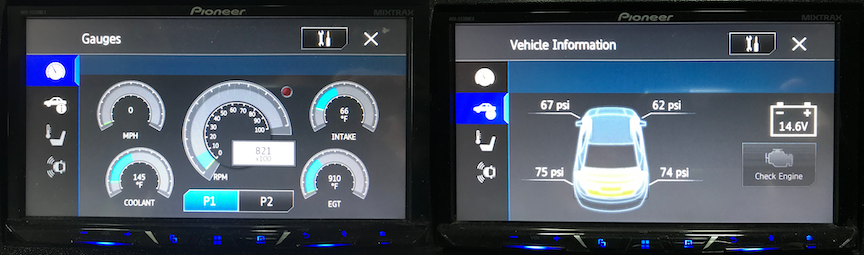
New ECU Features Provided by Maestro RR Interface
Installing the Speakers
I then moved on to installing the speakers. The Infinity component system was comprised of a 6 1/2 inch woofer for the door and a 3/4 inch tweeter for the A-pillar. It also included a crossover to distribute the proper frequencies to each speaker.
The door speakers were easy to access and remove. The round OEM cover just popped off with a little bit of pressure from a nylon spludge at the edge. While the speaker was out I adhered some neoprene insulation to the interior of the door behind the speaker to provide some dampening.
I then removed the A-pillar covers using the technique below.
- Using a nylon spludge or equivalent, gently unclip the A-pillar trim from the body, do not try to remove.
- Push the A-Pillar trim down at the same angle as the windshield pillar and disengage the top of the A-pillar trim from the headline.
- Disconnect the tether clip and disconnect the speaker electrical connector.
I ran a speaker wire through the rubber door harness cover and in to the dash area through the access points shown below and then ran the wires up the sides of the dash to the A-pillar area.
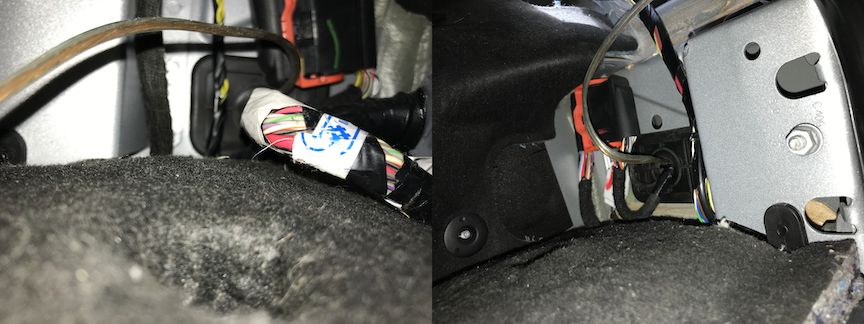
Speaker Wire Access Path from Dash to Doors
I removed the OEM tweeters and connected the component tweeters to the new wires and then hot-glued them in to position. This step was a lot easier than it sounds. It just took a couple of dabs of glue to hold each tweeter in place.
I then connected the original door speaker wire, the new component woofer and tweeter wires to the crossovers modules. I used industrial strength Velcro to mount the crossovers inside the doors just forward of the speaker hole. There was plenty of space and a nice flat area to secure them.
One of the included adapters made it fairly easy to mount the new door speakers. I did have to drill one additional hole in one of the adapters to match it up with the pre-existing screw holes in the door.
I turned on the head unit to test the system. The clarity and depth of the sound was significantly improved. It was now time to move on to the subwoofer installation to bring out the bass.
Installing the Subwoofer
I removed the passenger seat with the following procedure.
- Remove the battery cover from the floor.
- Disconnect the negative battery cable.
- Wait 30 minutes to discharge the air bag system. This is a necessary precaution as there is an air bag in the side of the seat.
- Remove the covers at the front and rear of the seat.
- Remove the two floor bolts at the front of the seat.
- Slide the seat forward off the rear pins.
- Disconnect the wiring harnesses.
With clear access to the floor I used industrial Velcro to secure the the subwoofer. The wires were easy to feed under the floor covering over to the battery box in the floor and then up through the console to the area behind the head unit. I found a free terminal on the battery’s fuse harness that I used to power the unit. The remaining wires each had a ready spot to connect on the head unit. The subwoofer had a remote control that I decided to adhere to the seat base on the aisle side of the pedestal.
I also took time at this stage to cover all of the subwoofer and any other OEM harness wires that were running under the floor cover with split loom covering to give them more protection.
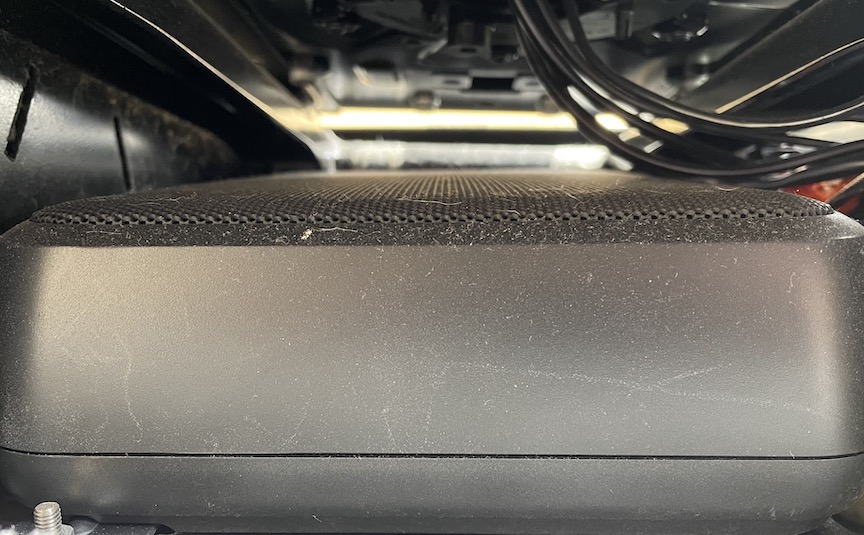
Pioneer TS-WX130DA Subwoofer Under Passenger Seat
I replaced the seat by reversing the procedure above.
I reinstalled the A-pillars covers by following the procedure below.
- Position the lower end of the A-pillar trim in the instrument panel.
- Connect the speaker electrical connector and install the tether into the A-pillar trim until the clip engages.
- Push the A-pillar trim down at the same angle as windshield pillar and engage the top of the A-pillar trim with the headliner.
- Position the A-pillar trim over the retaining clips and firmly snap it into place.
I replaced the lower dash panels and speaker covers and was ready to tune the system.
After a few moments of adjustment the system was all set. The effort was well worth it. The system was performing well and it sounded great!
A post on Part 2 of the audio system improvements will be along soon ….
Here are some of the parts and tools that I used on the project.
Pioneer AVH-2330NEX head unit. I’m not providing a link as the available lineup changes. Be sure to make sure that the unit you select is on iDataLink’s list of units that are compatible with the Maestro interface that you select.
iDatalink Maestro ADS-MRR Interface Module (There is a new RR2 unit available that offers some additional capability)
iDatalink HRN-RR-CH3 Factory Integration Adapter
Metra 95-6523 Dash Kit Promaster Van Kit 14-up, DD
Radio Antenna Adapter Cable Fakra Z Male to DIN
USB 2.0 Male to USB Mini Female Adapter
Infinity Kappa 60csx speakers. These speakers are no longer available. Crutchfield is a great resource to select a set of speakers with the attributes that fit your music preferences.
Metra 71-017C Speaker Wiring Harnesses
Pioneer TS-WX130DA Compact Active subwoofer
Sponge Neoprene with Adhesive 1/4″ Thick X 39″ Long X 9″ Wide
Thanks Bob for putting all this information together, you are a great resource!
You’re welcome Jim. I’m glad to help!
Bob
Thanks Bob, I have this info saved. We’d love to replace the head unit in our 2020 Lexor!
Awesome write up and appreciate all the detail! Does the Pioneer head unit retain the ability to enable / disable the DLR (Daytime Running Lights)?
Thanks!
Thank you! I’m glad that you found it to be helpful. Yes. All of the CAN-bus functions come across through the Maestro adapter. I disable my driving lights whenever I’m in a campground to avoid disturbing the other campers when the ignition is in the acc or on position.
Thanks Bob
This was what you sent me about a year ago and it’s worked out well.
notes –
1- Navigation requires a cell signal to start a new route. I discovered this when I drove to a no signal zone and couldn’t set the next destination.
Google Maps will let you download maps for a large area in advance. Apple Maps doesn’t (unless it’s been added recently)
2- The hands free microphone for the phone picks up a lot of vibration. The installer had mounted it on the rear view mirror, and everyone I called complained about road noise. I moved it to the dash on a piece of grey foam as a sound isolator. That helped.
3- The rear view camera looks blurry but useable on the larger screen. I asked at the forum, shop and Ram dealer and they all say it’s just a cheap camera designed to the original small screen.
Nice writeup Bob. Appreciate you taking taking time to document everything. I did a similar install on my 2019 Lexor FL when I first got it using existing components I swapped over from my previous van but my subwoofer would not fit under the passenger seat. Does your seat fully swivel with the subwoofer under it? I’m not sure if the earlier Ram van seat only had fore and aft adjustment or if it fully swivels. Thank you.
Hi Bob!
Yes my seat is a “captain’s chair” that swivels. There is no interference from the subwoofer.
Bob
Bob,
Could you add a few words about your latest head unit, the Pioneer DMH-WT8600NEX believe? That 10-inch screen is mighty tempting.
Thanks,
Larry
Hi Larry,
That’s coming in the Audio System – Part 2 post. It should be up in soon.
Bob
Hey Bob, I decided get the AVH-2500NEX and am in the process of installing it. When you installed your radio, how did you deal with the long light green ebrake wire? I’ve read that there are a few ways to bypass it, but not sure whether I want/need to do so. Thoughts?
Hey Bob, I did a little experimenting with the green ebrake wire. I touched it to ground and Andriod Auto started working. I turned the radio off and back on and Andiod Auto continued to work. I’m not sure whether I need to keep it grounded or not. Thoughts?
I just grounded that wire on my first installation and everything worked well. On the DMH-WT8600NEX the ground was not necessary. Pioneer included a software bypass in the 1.13 and subsequent firmware updates. To activate it you just have to go to the main screen and press the lower left corner for 10 seconds and then immediately press the lower right corner until a message flashes up showing “set ON”. I’m not sure if they have done something similar for other models but if the ground is working there is probably no need.
One more thing, I added the SiriusXM adapter to the radio. It came with a magnetic antenna mount. I’m wondering whether the second antenna cable that was connected to the stock radio (perhaps used for navigation?) will work for satellite radio? I’ll need a female-to-femail cable to make the connection. Just not sure that antenna cable is connected to anything?
Hi Jim,
I left that cable free on my initial setup but have now hooked it up to the GPS connection on my Pioneer DMH-WT8600NEX. I don’t have the SiriusXM adapter so I haven’t explored that capability. Please share what you discover.
Bob
Thanks Bob, BTW, I discovered that the AVH-2500NEX doesn’t support the OBDII port, so you can’t display any vehicle information. I returned it and am getting a AVH-2550NEX which does. You might want to mention this in your writeup.
You’re welcome Jim. That’s interesting. So the Maestro wouldn’t communicate CAN info with the AVH-2500NEX? I’ve updated the post with the AVH-2550NEX in its place. Sorry you had to be the “Pioneer” to find that out!
When I went to print out the Maestro instructions for the AVH-2500NEX, I should have questioned it when it didn’t list it under compatible radios. It did list the AVH-2550NEX. Live and learn. Thanks for your instructions.
Hopefully the harness is the same and you can just snap the new one in. My last three pioneer swaps have all had an identical harness.
Yes. The same procedure described in this article is applicable to to a 2019.